Using the Nine Patch Image node
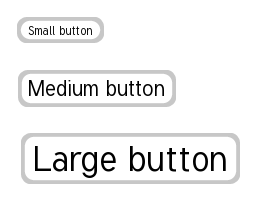
Use the Nine Patch Image node to create a scalable button background that scales with the size of the Nine Patch Image content. A Nine Patch Image scales its images in a controlled way, instead of scaling them as one unit. It places nine images in a 3x3 grid: the images on the edges form the frame, while the center image holds the content of a Nine Patch Image.
When you use Nine Patch Image, keep in mind:
- The center image stretches in all directions. For the best results keep that image transparent or solid color.
- The thickness of the corners defines the thickness of the frame for the central image. Kanzi does not scale the corners in a nine patch image.
- By default as the size of a Nine Patch Image changes, the top, bottom, right, and left textures scale according to the change in space between the corner textures. You can control this setting with the Wrap Mode and the texture type properties for each texture. See Creating a Nine Patch Image node.
Creating a Nine Patch Image node
To create a Nine Patch Image node:
- In a third-party tool, create images for each part of the Nine Patch Image node and save each in its own file.
You need to create the images for the:- Corners (top-left, top-right, bottom-right, and bottom-left)
- Sides (top, right, bottom, and left)
- Center
- In Kanzi Studio in the Assets click Import Assets and import all images you want to use in the Nine Patch Image node.
- In the Project press Alt and right-click the node where you want to create a Nine Patch Image node and select Nine Patch Image.
Note that you can create a 3D node only inside 3D nodes, and 2D node only inside 2D nodes.
- In the Properties set the Nine Patch Image properties to the images you want to use for each part of the Nine Patch Image node:
- Top-Left Image to the texture for the top left corner
- Top Image to the texture for the top border
- Top-Right Image to the texture for the top right corner
- Left Image to the texture for the left border
- Center Image to the texture for the center
- Right Image to the texture for the right border
- Bottom-Left Image to the texture for the bottom left corner
- Bottom Image to the texture for the bottom border
- Bottom-Right Image to the texture for the bottom right corner
- (Optional) You can control how a Nine Patch Image node displays the top, right, bottom, and left textures:
- In the Library > Materials and Textures > Textures select each texture that the Nine Patch Image node uses, and set the Wrap Mode property you want to use for each texture.
- In the Project select the Nine Patch Image node and in the Properties set the texture type for the textures you want to control (Stretch Type Top, Stretch Type Bottom, Stretch Type Left, Stretch Type Right, Stretch Type Center).
| Clamp | Stretch | Default value. Scale the texture to fill the space between the corner textures of the Nine Patch Image. |
| Clamp | Wrap | Extend the last column or row of pixels of the selected texture, when the width or height of the space between the corner textures of the Nine Patch Image exceed the width or height of the selected texture. |
| Repeat | Stretch | Scale the texture to fill the space between the corner textures of the Nine Patch Image. |
| Repeat | Wrap | Tile the texture when the width or height of the space between the corner textures of the Nine Patch Image exceed the width or height of the selected texture. |
Setting the image target format
When you export your project to a kzb file, Kanzi Studio reads the images in the project using the format of the original image and writes the images to a kzb file in the format you set with the Target Format property for each image.
If the file format of the original image is the same as the format you select in the Target Format property, Kanzi does not modify the image when it writes the image to a kzb file under these conditions:
- Premultiply Alpha is disabled, or the alpha channel does not need to be premultiplied
You can set the value of the Premultiply Alpha property in the > and in the properties for each image file.
- Generate Mipmaps is disabled
You can set the value of the Generate Mipmaps property in each image file.
- Round Images to Nearest Power of 2 property is disabled
You can set the value of the Round Images to Nearest Power of 2 property in the > .
To set the target format for an image in your Kanzi Studio project:
- In the Library > Resource Files > Images select the image for which you want to set the target format.
- In the Properties set the Target Format property to the image format you want to use in your Kanzi application.
The format you select is important because this influences the size of the .kzb binary and the loading time when your Kanzi application needs the resource. Make sure that your target device supports the target format you select for the image. See Images and textures best practices.
- If the image format you selected in the previous step supports compression, select the compression scheme you want to use. See Compressing textures.
Setting the background of a Nine Patch Image
Use brushes to set the background of 2D nodes. In Kanzi all 2D nodes by default have transparent background.
To set the background:
- Create a Color Brush, a Texture Brush, or a Material Brush. See Using brushes.

- In the Project select the 2D node the background of which you want to paint.
Note that you can set only the background of 2D nodes.
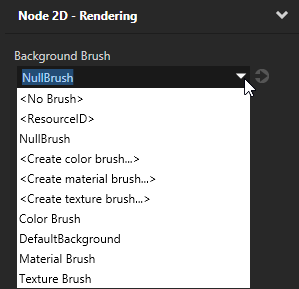
- In the Properties click
 , add the Background Brush property, and select the brush you created in the first step.
Using the Nine Patch Image node in the API
For details, see the API reference.
See also
Using the Grid Layout nodes
Using the Image node

Open topic with navigation